Showing posts with label recycle. Show all posts

Monday, April 27, 2015

~inspire me diy project~

Dear projects,
You are piling up.
Sometimes I love working with you, other days I just want to sleep and forget all about you.
But then I get on Pinterest, or an idea pops in my head, and the lists get longer.
A promise to myself~I will finish projects I have already started, AND, I will tackle projects that have been on my brain for a while now.
Thank you Kennesha for kicking my booty into gear on this project.

Presenting Inspire Me DIY where 10 of us design bloggers will show you a project we have been neglecting or just wanting to get around to, in hopes to inspire
 you to check things off your to do list as well!


My project was not necessarily a "must do" but more of a "I've been wanting to do it"
project.

I like to switch things out with seasons, shocking I know.
Just coming home from vacationing in Hawaii and seeing all the gorgeous blues of the water and skies,  and all greys and tans of the sand, made me want to bring a little of that into my own home.
I had also been wanting to update my Ikea chair slips that I stenciled numbers on a while back.
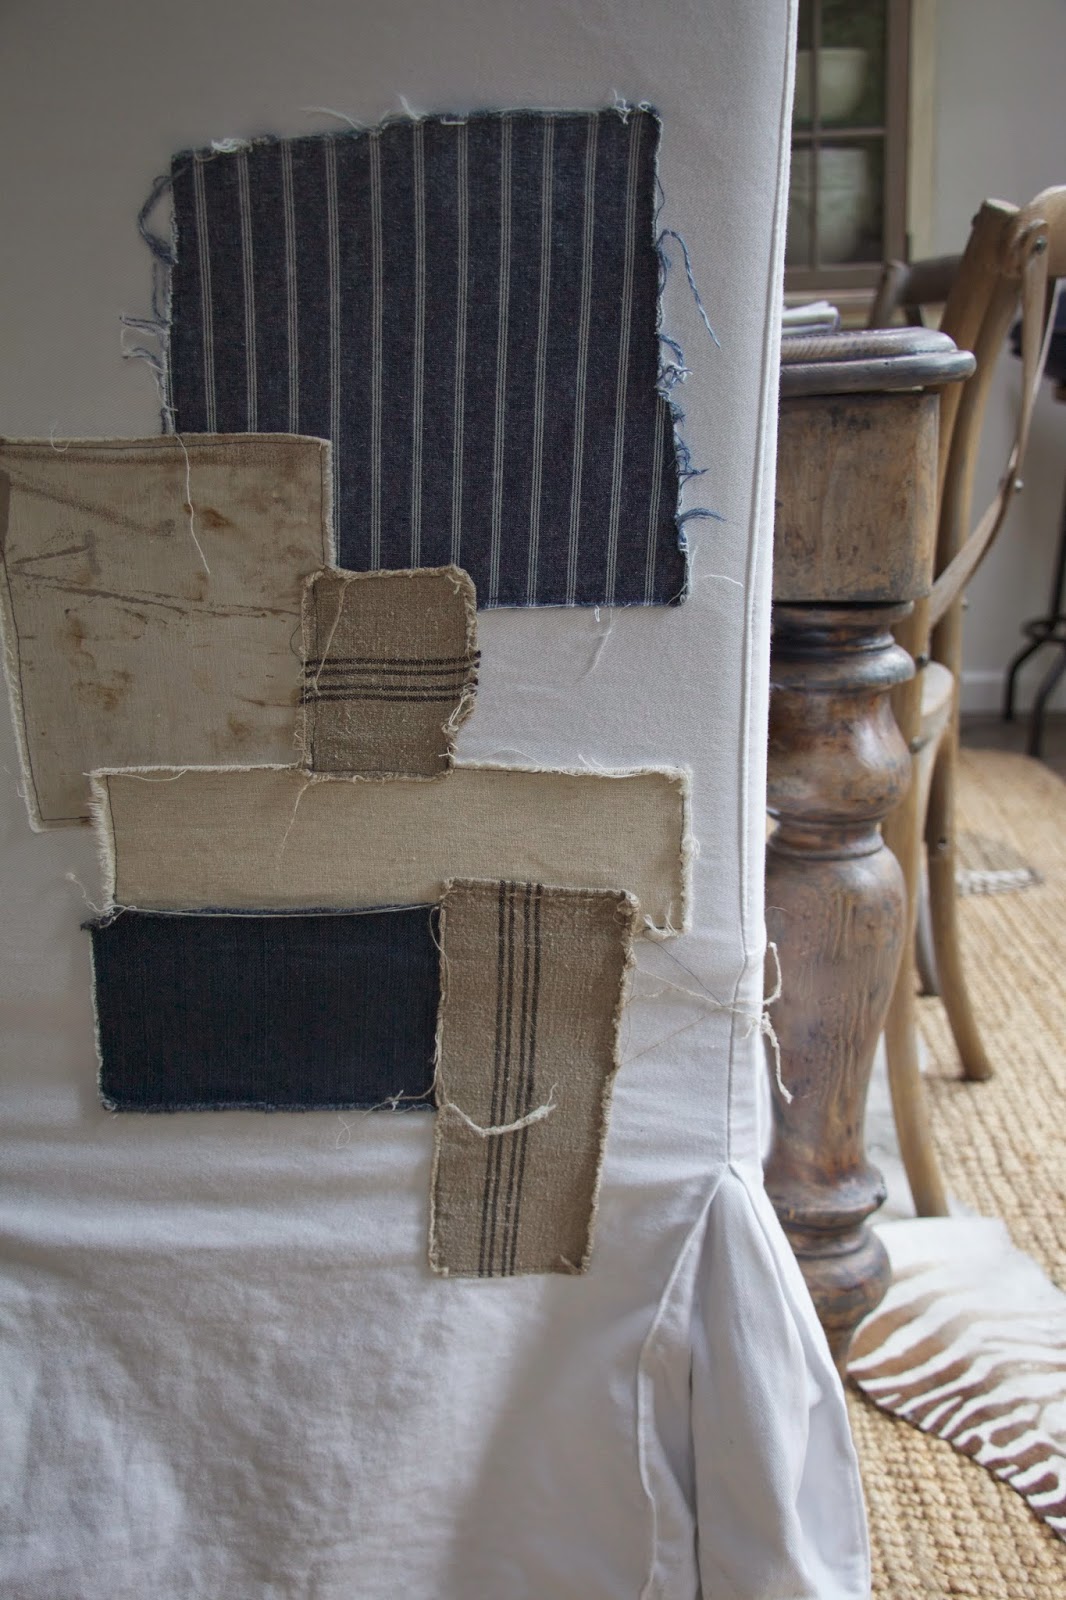
So, I went out to my studio and pulled out all the blue and indigo colored fabric I had as well as any old tan grain sack material I had.


Then I went over to my moms to borrow her sewing machine because mine is on the fritz. I explained what I was doing and she pulled out this pair of pants from her sewing pile.
She bought them at a thrift shop for the fabric.
I swear, my mom is way hipper than this!
Not to be confused with hippier…..


The fabric was perfect! I began to cut up random sections of my fabrics and then sew them on.


No real rhyme or reason, but I did want the edges to be frayed so I left them raw.


I love the mix of the old and new fabrics.


The project took longer than I expected, but  I love how they turned out and I love that this project is now checked off the list!


Can you find the ugly pants in the picture below?
Much better on the chair right?


 This tan material was left over from another project.
It's vintage grain sack and I love the the old original stitching.
The polka dot piece below it is from another pair of jeans.


Are you running to your closet to survey all your jeans right now?
To see what the other bloggers are up too go 
here to view House Seven

here for Restoration House

here for This That And Life

here for Ms Craftburry bush

here for Thoughts From Alice

here for Simple Stylings

here for Through The Front Door

here for Migonis Home

and 

here for City Farmhouse


I hope we have inspired you!
xoxo

Thursday, January 15, 2015

~thrifty Thursday~{heart sign}

I saw this sign recently and thought it was so cute,
 so I tried to recreate it in my own way, for way less money.

I started with some pieces of wood that I already had put together.
You could use pallet wood for this easily though.
In fact it was from this project, which I took apart.
You could say I repurposed a repurposed item!


To make the heart pattern, I taped several pieces of paper together and then folded it in half, and cut.


Using a pencil, trace around the edge of your heart pattern and discard.


Next up you will need to paint your heart.
I used a light grey chalk paint.
Let dry.
Obviously I was to impatient and took a photo of it while it was still wet.


Using 1 1/2" blue painters tape, tape off straight sections over the heart, evenly spaced.


Paint those areas with a cream colored paint, or the color of your choice.


Let dry and then remove tape.


This is the part where you can get really creative.
Using a pencil, hand draw on a quote, a poem, a saying, lyrics to a song, etc.
Don't worry about your penmanship, the more handwritten looking, the better!


Using a thin paint brush, go over the pencil with black paint.


When it is all dry, you can lightly sand over the whole heart to distress it a bit.


Because I had everything on hand, this project didn't cost me a dime.
I love FREE projects, don't you?


Have a great day!
xoxo

Monday, November 3, 2014

~classic wood prints~{a giveaway}

I want to introduce you to Classic Wood Prints.
Take your favorite photo or artwork and have them etch it into a piece of wood. Classic Wood Prints is a unique art form that blends wood working and photography to capture a beautiful way of storytelling.

And here is the cool part. For every print sold-a donation will be made to Plant-It 2020, giving back to the environment and community by planting trees, providing direct humanitarian aid and restoring forestry.

So, turn that adventurous summer or favorite travel moment into a photographic keep-sake on wood. These are great holiday gifts and decoration. The prints are designed to last more than 20 years without fading which uses a UV ink, a fully cured ink that becomes "one" with the wood that brings out the beautiful wood grains. 

It's a great way to do your part to keep an eye on the environment and giving wood a gift that crease a lasting reminder of your happy moments.

is generously giving one of my readers a custom print, any size up to a 13x20!
Please follow them on instagram right here to see some very cool work.

So, what would you get printed if you won?
A photo for yourself, or one for a gift?
Can't wait to hear what you would create. 
Just leave me a comment to be entered, along with your email address.
Like always, you don't need a blog to enter, just need a way to contact you if you are the lucky winner.
I will announce back here on Friday, good luck!


xoxo


Thursday, July 31, 2014

~thrifty thursday~{a fairy garden chair}

What happens when one of your beloved Restoration Hardware
 dining chairs seat caning
blows out? 

You cry a little, then you get over it and turn it into garden art.
A fairy garden to be exact.


Start with any chair that has no seat.
At your home improvement center pick up a basket liner that looks like this and that will fit the opening of your chair.


Using a staple gun, staple it in place.


Add potting soil and plant with your favorite flowers.
I used lavender and a ton of succulents.
I think the succulents are perfect for this project.
At this point you can leave it as is, or to turn it into a fairy garden, continue on…..


I wanted to hang a little sign from the chair, so I painted these words on a piece of chippy old wood I had. Hang it from twine for a rustic garden feel.


Now you can start to add in little fairy furniture if you wish.
I added a little wire chair and table, and miniature log fence pieces.
I added a fairy as well but I thought it cheapened the look, so I took her out.


 Tuck the furniture in here and there for a "secret garden" look.
I found all my furniture at a craft store.
I am sure you could look in the kids section at thrift stores and find some great things, or perhaps you have some old dollhouse furniture?


 Make sure you have plants that trail down over the sides, this looks best 
and gives it the look that it's not newly planted.


And that is it!
This will be available for sale at the French Flea Market this Saturday.
Hope to see you there!
xoxo

Thursday, May 22, 2014

~how to make a faux wood arrow~{thrifty thursday}

While I was hard at work on the One Room Challenge, one of the things I looked into was new flooring. Although those two things called "time" and "budget" came into play, so we ended up just touching up the floor we have. 

One thing home improvement stores are offering now is free floor samples.
I think this is genius for visual people like myself.

You can bring home samples and lay them out to see what it would look like.

Here are some samples I brought home. It's a whitewashed faux wood.
Each piece measures approx. 3x6"

After sitting around for a while I decided I'd put them to use and make a faux wood arrow, and here is how you can as well!


Gather your supplies.
You will need:

Liquid nails, or another strong glue.
Blue painters tape {optional}
MDF, I had some left over from my faux snakeskin drawer liners.
A pencil and ruler. {Or tape measure}
A jigsaw.


Lay out your pieces of flooring on a piece of MDF and glue down.


Place heavy objects on top and let dry several hours to overnight.


The following day, remove your heavy objects and using a pencil and ruler sketch out your arrow shape. There are so many different arrows to choose from.
You can make a whimsical one, or a traditional one, up to you.

{If you need a pattern you can enlarge one that you print from home at a copy center, cut out, and trace around it.}

I used blue painters tape to outline where I had drawn the pencil because it was a little hard to see.


Using your jigsaw carefully cut out along your pencil/tape lines.
I left my edges raw but you could always add a contrasting color of paint for fun.


I think it turned out so cute!
This could be hung indoors or out, or just propped on a shelf.


Happy crafting!

xoxo